Wednesday, October 31, 2012

New Challenges and Celebrations

We were spared the worst of the hurricane but my feelings are with all the people who have lost loved ones, have been left homeless, without electricity, and have a big clean up ahead of them.  You are in our thoughts.

The last of the fall colours
  I have pretty much finished my first rug hooking project.  I just need to add a few highlights, tone down some of the areas, and fill in some spaces that can only be seen from the back.  This one was done all in wool yarns.   I am now anxious to gather up enough strips of fabric to try a bigger one on my large frame.

 And here is a peek at the challenge piece I am doing with my fibre arts group.   We chose either orange (tomato red) or blue and the piece needs to be at least 20% of that colour.  My inspiration is a photo of tiny red orange mushrooms that I took in Cape Breton a couple of years ago.  Here it is before I started to stitch.  I have since added some dyed cheesecloth, stitched leaves, and will also add some tiny pebbles as I go along.  I plan to do a lot of hand stitching on this one.


I have also started to paint a background for a larger stitched piece which will be a swamp when it is finished.  I hope to do some free motion stitching on this but I need to practice first.  I went out today and bought a new hoop and some stabilizer to get me started.

Background for a swamp - painted with setacolours and caran d'ache crayons and pencil crayons

Last weekend I celebrated a birthday!    Birthdays have a different meaning these days.  They seem to come so quickly.  I was just getting used to the big one that came last year and now I am one past the big one.  Yuck!  Nevertheless I celebrated with three of my friends and we ate lasagna, drank wine, and read our cards - which ended up turning into more of a brainstorming problem solving discussion about each of our 'questions', along with a lot of laughter.  One friend said she had a sore tummy from laughing so hard all evening.
Here I am showing off my handiwork
And here are my three friends at work in the kitchen
We thoroughly enjoyed ourselves and I realize that I am truly blessed to have good friends in my life!

Thursday, October 18, 2012

My New Rug Hooking Frames and Thoughts on Rug Making

Rug Hooking Frame made by Yvon Michaud of Cheticamp, NS


I have been fascinated by East Coast Rug Hooking since I discovered the books written by Deanne Fitzpatrick who tells stories with her colourful hooked rugs.   Many of her rugs describe growing up in Newfoundland and the history and customs of the people (she is located in Nova Scotia now).  The accompanying narratives add more depth and emotion to the stories in her rugs.    I am drawn to new ways to tell stories with art and to the simplicity (you only have to learn one stitch) yet complexity (capturing a design with that one stitch) of rug hooking.   Deanne has online courses available and I am hoping to take one.   Closer to home, rug hooker Loretta Moore teaches classes and workshops as well and I am thinking about signing up for one of hers as well.  

When I was in Newfoundland my friend  showed me the beautiful hooked wall hangings she has done and took me to the shop of a rug hooker and teacher.  I returned by myself to watch people busy at work hooking rugs for an upcoming event.

 A few years later I visited both Les Trois Pignons museum and Jean's Gift shop near Cheticamp and saw what possibilities exist for creating beautiful rugs and wall hangings.   I was 'hooked'.  
Museum had some amazing detailed historical pieces of Prime Ministers, Presidents and scenes from history

More museum pieces - What detail and colour!

More of our Heritage

The Museum has loads of fascinating details about the history of rug hooking in the Cheticamp area
I started gathering wool yarn wherever I went because much of the work I first saw in Newfoundland was hooked with yarn rather than strips of wool fabric.   I bought a hook and using a picture frame as a base, I started to hook.  But I found the frame difficult to work with as the work sagged and came loose from the frame etc.  so my first piece gathered dust on a shelf.


In September when I was in Cape Breton, I again visited Les Trois Pignons and saw some nice tabletop frames and a beautiful floor model that they were using for demos.   I got the name of the maker because I was flying home soon after and contacted him from Ontario for more information.  I ended up purchasing both this floor model and the tabletop one.

The gears keep the work nice and taut

It was easy to assemble

My cat checking out my new tabletop rug hooking frame
 
 They are exactly what I was looking for!!   These traditional Cheticamp style frames are highly regarded by rug hookers.   Yvon Michaud of Cheticamp is the maker of these particular frames.  His prices are very reasonable, and the frames are well made of kiln dried maple.  He was prompt and answered all my questions.  The shipping was not expensive, the frames arrived quickly, were well packed, and I was able to assemble both frames easily by myself.   I also purchased another hook from him.   I would highly recommend his work and if anyone is interested I would be happy to give you his contact information.

I have attached the small piece I was working on to the tabletop frame (which I purchased for its portability) and it works well.  The piece is sewn to the two canvas strips and held at the sides with the cup hooks (string on one side because it is such a small piece).   Both rollers can be adjusted for tension and the work stays taut never saggy.  My technique is still pretty rudimentary and I won't show you the back of the piece...


I am in the process of designing a piece which I will do on my larger frame.   There is lots of great info online, videos on you tube and lists of wool supplies as well.    But the first thing I did (because I want to start working with wool strips) is to go to the thrift shops and purchase old wool clothing, wash and dry them, and disassemble them into pieces to be cut into strips.
Three blazers and a wool scarf ready for use

A wool and silk blazer and wool camel coat - still to be disassembled

This fuschia coat was a real find for me - love that colour


 It is a bit of work (I'm thankful for my seam ripper) but less expensive than buying yardage.   Another great thing to have is a cutting machine to cut the strips but they are expensive so I'll have to make do with my rotary cutter.

I was surprised at the emotions that came up as I was taking apart these second hand clothes.   I thought a lot about the people whose hands sewed these coats especially when coming upon inner stitching/basting obviously done by hand.   The linings and interlinings, padding etc that goes into the construction of a coat or jacket gave me such respect for the workers who do the work and I wondered about the conditions they work in and the pay they received.   I also felt a little guilty taking apart their work when people could still be wearing these clothes.  However the thrift shop had reduced them for sale and I reasoned that they wanted to make room for newer stock.  Perhaps I was saving them from the landfill.  I also thought about the people who had worn those clothes.  I have worn second hand clothing before but the act of handling and unstitching the clothes seemed to give rise to a more intimate connection with the makers and wearers.   I wonder if others have ever experienced these feelings.   Quite unanticipated!

I'm also starting a few other quilting projects - including a colour wheel challenge, some water themed pieces, and goddess dolls.  More about that later.   What a long post this is!


Monday, October 15, 2012

Revisions to Beading Challenge and Labelling my 'Book'

Sometimes it pays to look at a piece for a couple of weeks before submitting it to a show.  After finishing my peacock piece it really bothered me that the beadwork filled in all the spaces.  I wanted the centre to pop and felt that it just wasn't isolated enough.   So I bravely removed all the beads around the peacock so there would be some black space and moved them closer to the bird itself.  I think it is an improvement.   Here is the new and improved bird titled "With Eyes Like Diamonds in the Sky"

With Eyes Like Diamonds in the Sky


And here is the original - with too many beads!


You can vote on which one you prefer but it just might make me feel bad because I am submitting the new and improved version today so it will be too late for any more changes :)

I am also submitting my 'From a Book' piece today and wanted to show you my label.  I would have liked to see a rainbow in the piece since Somewhere Over the Rainbow is one of my favourite songs, but it just didn't work out.   So I printed a rainbow on the label using an old cropped photo I had taken in Cape Breton.   I don't have a fancy editing program so I just opened the photo in 'Paint' mode on my Windows 7 photo program, added text and printed it out on my inkjet fabric sheets (EQ Printables).  Here it is attached to the back of my 'book'.


Next time I will post photos of my new rug hooking frames that arrived Friday.  I am so excited!

Thursday, October 4, 2012

From a Book piece is finished


Follow the Yellow Brick Road to the Emerald City

I have finished my From a Book themed piece.  In the end I decided to fashion it into a 3 dimensional book including both a front and back cover using stitches, glue and staples over a thick stretched canvas.  The piece itself is the front cover.  I added a bit of a frame top and bottom then wrapped it all over a piece of cardboard and glued it down, then I glued the cardboard down to the stretched canvas.  There is only glue on the overlapping fabric not the piece itself.
As I mentioned before I machine stitched the words along the spine of the book using my letter capability on my machine.

For the pages, I machine stitched lines on a long piece of fabric then wrapped it round the 3 edges of the stretched canvas and glued and stapled it on.  I plan to fashion a special label and place it on the back cover.  Hoping to incorporate a rainbow.
If I had thought ahead, I would have made the front cover to open and placed a photo from The Wizard of Oz inside but that idea came too late.   The construction part was challenging and it is not at all perfect but I am kind of proud that I was able to construct a 3 dimensional piece.  Other than my goddess dolls, I believe this is the first 3D piece I have made.

I am linking this post to the Needle and Thread Network's WIP Wednesdays.   To visit, just click on the link on your right (the red one!)

Tuesday, October 2, 2012

New Fibre Art Challenge - Stittsville Library Exhibition

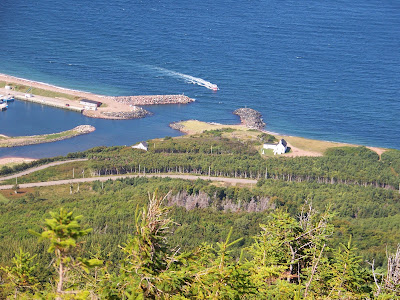
View from Robert's Mountain, Cape Breton

 I'm back from my hiking trip in Cape Breton and I finally have something to blog about and time to do it.   First of all, I was proud of myself on this hiking trip to be able to finish one 24 km day hike through a wet, rock-hopping, stream-crossing trail with no ill effects.  I have noticed in the past couple of years that my endurance is decreasing - having some foot pain etc - so this was quite an accomplishment for me.   Another day (our first day of hiking) we hiked up the steep Robert's Mountain and were rewarded by a beautiful view.  After 3 days of sun it rained for the next 3 but we still managed to enjoy the experience.

Follow the Yellow Brick Road to the Emerald City


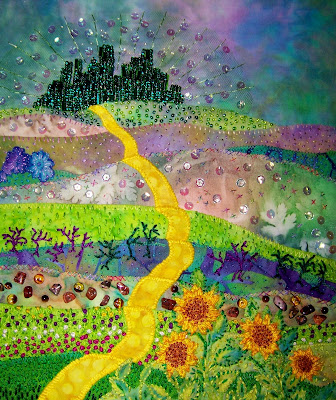
This piece is part of a challenge to create fibre art with the theme of From a Book.  I spent last week finishing it up and still need to mount it on a stretched canvas.  I hope you can see that it is from The Wonderful Wizard of Oz - the yellow brick road leading up to the emerald city.  There are a couple of firsts for me in the construction of this piece.   For the first time, I have used my sewing machine to do some of the piecing of the background, still using raw edge applique and mostly zigzag stitching.   Then I switched to hand stitching for other edges.  Can you see below which pieces are attached by machine?


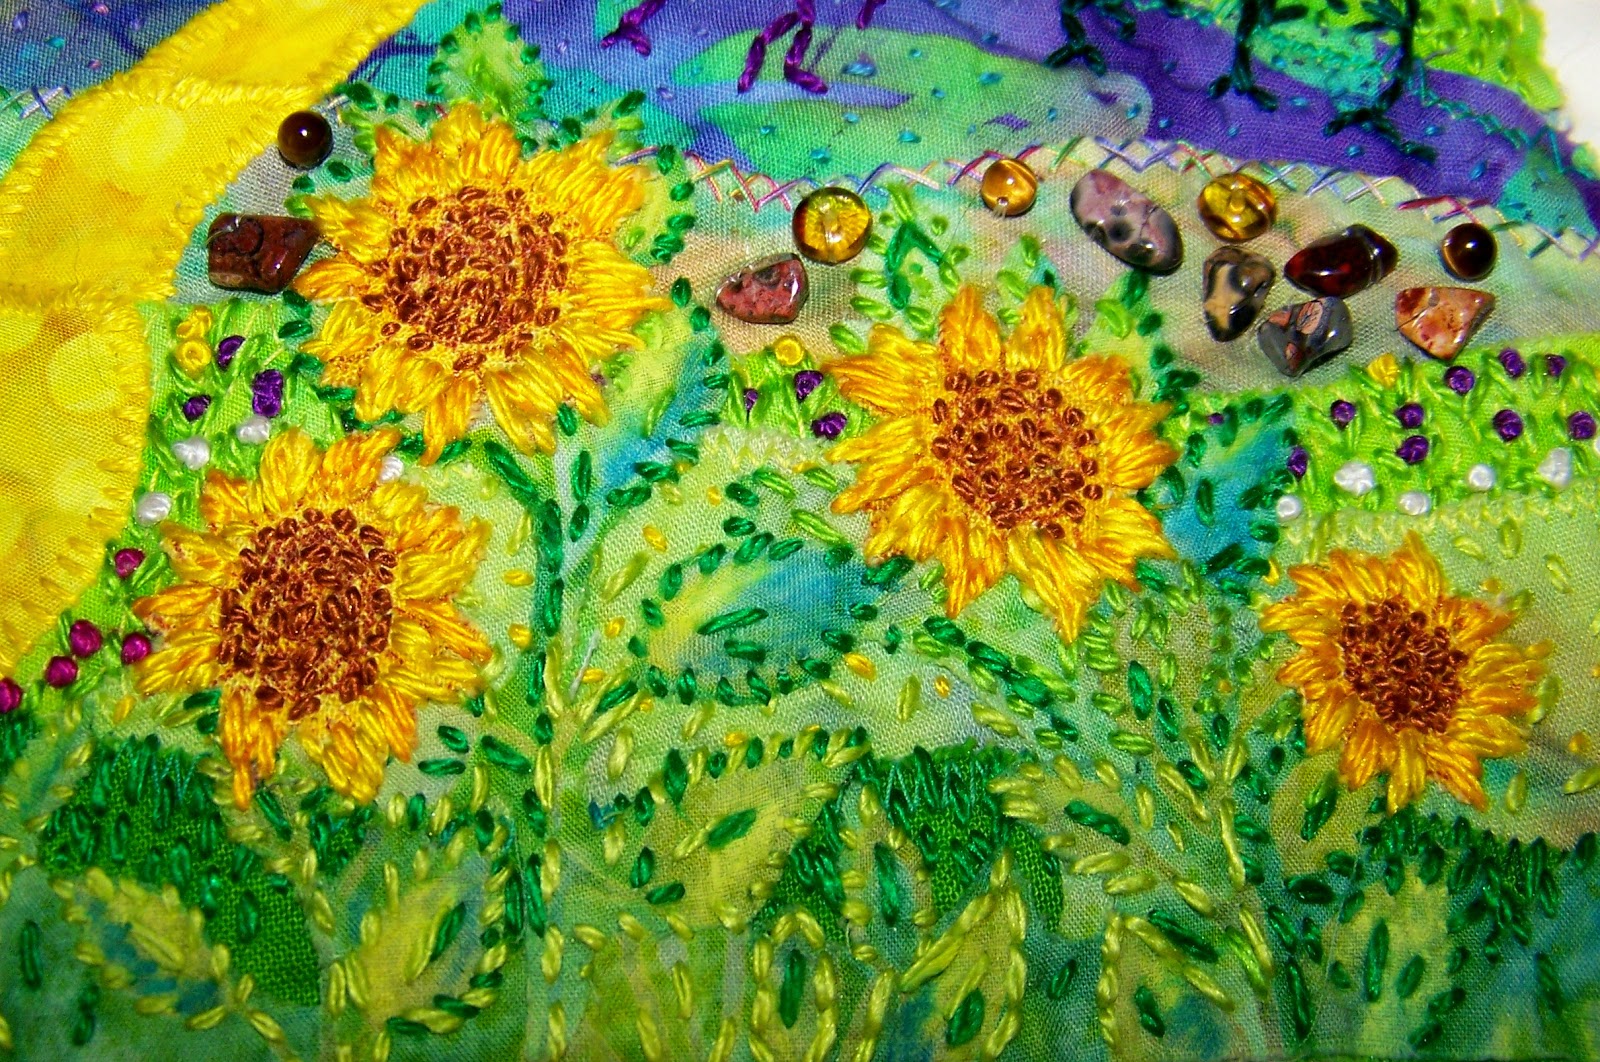
Here is a close up of the tulip garden using french knots and the tree section using heavy silk thread.  I added the scary tree section and a section of 'rocks' to signify that the journey was
not all a bed of flowers.


I was able to use a lot of symbolism as the path winds from lush green fields, past flowers, rocks, dark forests, plains, and on to the sparkle of the emerald city.  Below is a close up of the embroidered sunflowers which I added to represent Kansas, Dorothy's home.


And here is another first for me - using bead work exclusively to create the city.  I have used beads for emphasis in many pieces but using such dense bead work was very difficult since I realize that I don't really know how to bead onto fabric.   Adding random beads is one thing but beading a solid object is something else.  Keeping them straight and even, making sure they lie flat - yikes!  It was mostly done by trial and error (and is a little wonky for sure). Note to me - I must take a class in beading onto fabric.


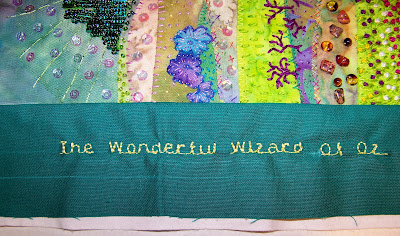
Finally,  I used the letter capability on my machine to write the name of the book.  I actually saved letters in the machine's memory and let the machine do the rest.  I had to save in two different memories because I didn't have the capacity to sequence all the letters at once and didn't know how to add a second sequence to the same memory (or maybe it's not possible?)   And though I set the first part to tie off it did not and started to repeat the pattern (so I had a little picking out to do).

My plan is to mount this on a thick stretched canvas.   The emerald coloured piece with the title will become the spine of the book.   The other three edges will need to look like the pages of a book.  I am still thinking about how to do the page edges so that they look like pages but are still somewhat interesting to look at.  So far I just have white fabric with lines along it.   May need to sew along some of the lines with sparkle thread perhaps.

This will be part of a group exhibition of work from my fibre arts group - Out of the Box.   Each piece will represent a theme 'From a Book'.   The exhibition will hang in the Stittsville, Ontario library from November 1, 2012 to November 30, 2012.

One more exciting thing!   A few years ago I read Deanne Fitzpatrick's rug hooking book, East Coast Rug-hooking Designs and I was 'hooked'.  She tells stories with her beautiful rugs combining various fibres, mixing traditional methods with new patterns and ideas as well as recording the history of Newfoundland in her rugs (she also has three other books and some wonderful YouTube videos).  It is the storytelling aspect of her work that really appeals to me since I also work with stories in my quilts.   A couple of years later in Newfoundland I saw more rug hooking, including some lovely pieces done by my friend Joyce.   So I bought a hook and some yarn and started hooking.   I nailed it to a wood frame but found it awkward to do.  The piece was never finished.   On this last trip to Cape Breton I visited Les Trois Pignons, a museum near Cheticamp,  which is the centre for a long tradition of hooked rugs.  There, I saw some Cheticamp style rug hooking frames which were exactly what I was looking for.   Last week, I contacted the maker and the result  is that I am in the process of ordering both a floor model and a portable tabletop model - both very reasonably priced.  I am so excited!!  I will post photos when I receive them.